The success of your moving day isn’t just about getting everything packed and loaded; it’s equally about the efficiency of unloading and unpacking. Without a clear “box labeling system,” your new home can quickly transform into a labyrinth of misplaced belongings, turning what should be an exciting fresh start into a frustrating scavenger hunt. Imagine your “open first” box ending up in the basement, or your kitchen essentials landing in the spare bedroom. This common scenario prolongs the settling-in process and adds unnecessary stress. A well-executed strategy for “how to label moving boxes” is the silent hero of a smooth relocation, ensuring every item finds its rightful place on the first try, saving you time and energy.
This guide will show you precisely “how to label moving boxes” like a professional, focusing on a comprehensive room-and-priority system that makes unloading lightning fast. We’ll dive into the effectiveness of color coding, sequential numbering, and the creation of a detailed inventory list, all designed to empower your moving crew to place boxes in the correct rooms without a second thought. By implementing these practical “moving box labels,” you’ll not only protect your belongings but also streamline your entire move, making your new house feel like home much sooner. For instance, when local residential movers arrive, clear labels significantly speed up their process.
💡 Key Takeaway: A disorganized move often stems from poor “moving box labels.” Learning “how to label moving boxes” effectively is crucial for a fast, stress-free unloading process. A robust “box labeling system” prevents misplaced items, saving time and frustration, and quickly transforms your new house into a home.
Building Your Efficient “Box Labeling System”
1. The Room-and-Priority System: Clear Destination is Key
The foundation of any effective “box labeling system” is clearly indicating where each box belongs in your new home.
- Designate New Rooms: Before you even start packing, walk through your new home (if possible) or review its floor plan and decide which room will be which. Assign clear names: “Kitchen,” “Master Bedroom,” “Living Room,” “Kid’s Room 1,” “Bathroom 2,” “Office,” “Garage,” etc.
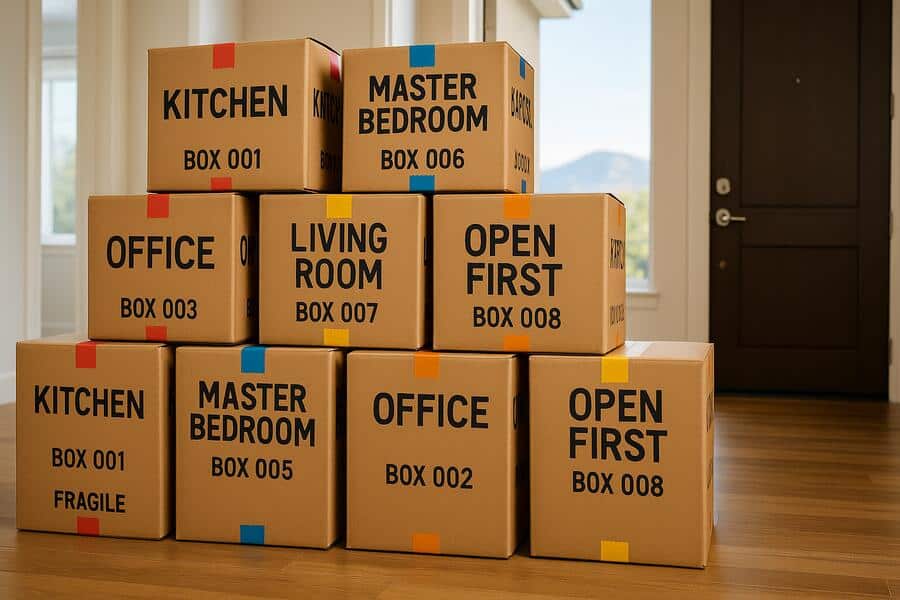
- Write on Multiple Sides: Use a thick permanent marker and write the destination room name clearly on the top AND at least two (preferably three) vertical sides of every box. This ensures that no matter how the box is stacked, the room name is visible.
- Priority Indicators: Add “Open First,” “Fragile,” or “This Side Up” labels as needed. Consider specific boxes like “Essentials” for the first night (toiletries, a change of clothes, basic tools, coffee maker). These “moving box labels” help movers handle items correctly and prioritize unloading.
- Brief Contents Summary: A short description of the contents is helpful but keep it concise (e.g., “Plates & Glasses,” “Winter Sweaters,” “Office Files”). This isn’t a detailed inventory, but a quick reference for unpacking.
2. The Power of Color Coding and Sequential Numbering
Adding color and numbers supercharges your “moving box labels” for unparalleled efficiency.
- Assign One Color Per Room: Before you pack a single box, assign a distinct color to each room in your new home. For example: Red for Kitchen, Blue for Master Bedroom, Green for Living Room, Yellow for Office.
- Buy Colored Packing Tape or Labels: Purchase rolls of colored packing tape or colored sticky labels corresponding to your assigned room colors. Apply a strip of the designated color tape to multiple sides of each box, or use large colored labels. This visual cue allows movers to identify a box’s destination at a glance, without needing to read text, especially from a distance.
- Sequential Numbering: Number every box uniquely and sequentially as you pack it (e.g., “1 of 50,” “2 of 50” or simply “Box 1,” “Box 2,” etc.). Write this number clearly on the top and at least two sides of each box. This helps you track every box and confirm nothing is missing upon arrival.
- Combine Signals: A box should ideally have three visual signals: Room Name + Color Code + Box Number. This redundancy ensures maximum clarity for your “local residential movers.”
💡 Key Takeaway: To effectively learn “how to label moving boxes,” start with a room-and-priority system, clearly marking the destination room and any special instructions (“Open First,” “Fragile”) on multiple sides. Enhance this “box labeling system” with color-coded tape for each room and sequential numbering for every box. This multi-layered approach ensures “moving box labels” are visible and immediately understood, making unloading swift and organized.
Inventory, Protection, and Post-Move Strategy
3. The Essential Inventory List
While labels are for movers, an inventory list is for you, providing ultimate control and peace of mind.
- Master Inventory Sheet: Create a master inventory list that correlates with your box numbers. For each box number, record:
- Box Number (e.g., “Box 12”)
- Destination Room (e.g., “Kitchen”)
- Brief Contents (e.g., “Pots & Pans, Cookbooks”)
- Any Special Notes (e.g., “Fragile,” “Missing Lid”)
This list is invaluable for confirming all boxes have arrived and locating specific items.
- Digital vs. Paper: You can create this list on paper, or use a spreadsheet or a dedicated moving app. A digital list allows for easy searching and updating.
- Keep it Safe: Keep your master inventory list with you during the move, not packed in a box. It’s your guide to verifying everything has made it to the new home.
- Condition Notes: For high-value or fragile items, consider adding notes about their condition before the move, especially if you’re working with professional movers and valuation coverage.
4. Final Checks and Unloading Strategy
Even with perfect labels, a little coordination on moving day goes a long way.
- Clearly Mark New Rooms: In your new home, consider placing signs on each room’s door corresponding to your labeling system (e.g., a “Kitchen” sign with a red paper). This visually guides movers.
- Direct Traffic: If you’re physically present, assign someone (you or a trusted friend) to stand at the main entrance of the new home to direct movers to the correct rooms as boxes come off the truck. This is especially useful for “moving box labels” that are less obvious.
- Unpack the Essentials First: Use your “Open First” boxes and your inventory list to quickly locate and unpack critical items like toiletries, basic kitchenware, bedding, and children’s essentials.
- Post-Move Review: Once all boxes are off the truck, do a quick walkthrough and check against your master inventory list to ensure every numbered box has arrived.
Effective Moving Box Labeling at a Glance
| Component | Details | Benefit for Fast Unloading |
|---|---|---|
| Room Name | “Kitchen,” “Master Bedroom,” “Office” – written on 3 sides & top. | Movers can quickly place boxes in the correct room on first entry. |
| Color Code | Assigned color tape/labels per room (e.g., Red=Kitchen). | Visual cue for instant room identification, even from a distance. |
| Box Number | Sequential number (e.g., “Box 1 of 50”) on 3 sides & top. | Helps track inventory, ensures no boxes are left behind. |
| Brief Contents | “Pots,” “Towels,” “Books” – 2-3 keywords. | Aids in prioritizing unpacking, finding essentials quickly. |
| Special Instructions | “Fragile,” “Open First,” “This Side Up.” | Ensures careful handling and immediate access to critical items. |
💡 Key Takeaway: Beyond just “moving box labels,” create a master inventory list corresponding to your box numbers, detailing contents and destination. This list is crucial for tracking every item and confirming arrival. On moving day, clearly mark rooms in your new home with signs or color codes, and direct movers to ensure boxes are placed correctly, enabling a rapid “unpack after move” process for your essentials.
Conclusion
Mastering “how to label moving boxes” is a small effort with a massive payoff on moving day. By implementing a clear room-and-priority system, leveraging the power of color coding and sequential numbering, and maintaining a detailed inventory list, you transform what could be a chaotic “unpack after move” into an organized, efficient process. Your “box labeling system” not only ensures your belongings are handled appropriately and placed in the correct rooms but also significantly speeds up the entire unloading process. Invest the time in these “moving box labels” upfront, and you’ll be well on your way to quickly transforming your new house into a comfortable, functional home.
Have questions about how to how to label moving boxes? Reach out to our team today.
Frequently Asked Questions About How To Label Moving Boxes So Unloading Goes Fast
What is the most important information to include on “moving box labels”?
The most important information to include on “moving box labels” is the destination room in your new home (e.g., “Kitchen,” “Master Bedroom”). Write this clearly on the top and at least two sides of each box. Additionally, including a sequential box number and a brief summary of contents is highly recommended for an efficient “box labeling system.”
How can color coding help with “how to label moving boxes”?
Color coding is an incredibly effective strategy for “how to label moving boxes” because it provides a quick visual cue for movers. Assign a distinct color to each room in your new home (e.g., red for kitchen, blue for bedroom) and apply corresponding colored packing tape or labels to each box. This allows movers to identify a box’s destination at a glance, speeding up the unloading process significantly.
Why is sequential numbering important for “moving box labels”?
Sequential numbering on “moving box labels” (e.g., “Box 1,” “Box 2,” etc.) is crucial for tracking purposes. It helps you keep a master inventory list, ensuring that every box loaded onto the truck also arrives at your new home. This system helps verify that nothing goes missing and provides a clear record for locating specific items when you “unpack after move.”
Should I include a detailed inventory of contents on the “moving box labels” themselves?
While a brief summary of contents is helpful on “moving box labels” (e.g., “Pots & Pans”), it’s generally not recommended to list every single item in detail directly on the box. Instead, maintain a separate, master inventory list that corresponds to your box numbers. This list can contain a more detailed record of contents, special notes, and even condition, which you can keep safe with you during the move.